Saturday 24 July 2010

Tutorial 5 - Sew White Vintage Style Top - Part 2

Tutorial 5
White Vintage Style Top - Part 2
Vintage Style white top - Application of frill to puffed sleeve


Part 1 took us to this stage of the Vintage Style top and Part 2 will show us how to apply some georgeous scalloped frills onto the sleeves

1. With the remaining part of the scalloped hem that we cut off the UNI QLO top in Part one, lay out onto an ironing board, lining up the scallops.

Stretch the elastic of the sleeve to see how long the frill should be.

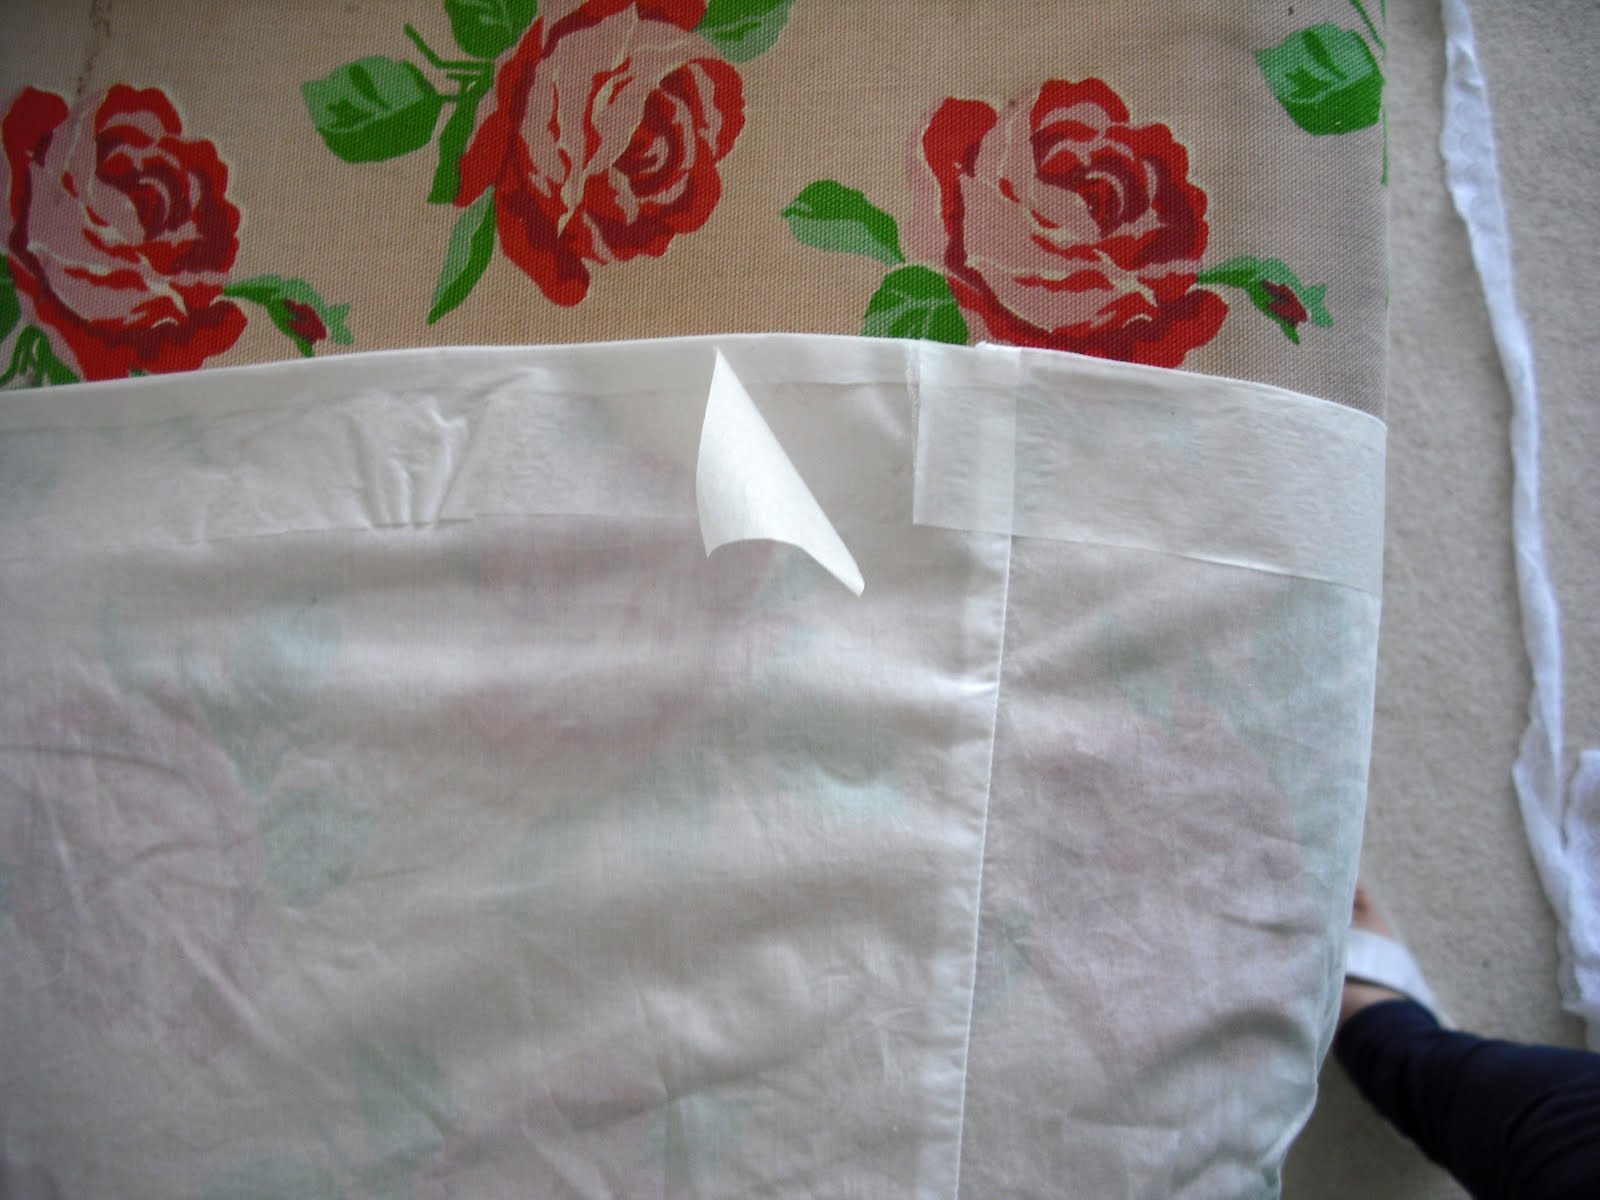
2. Then fold over and press with an iron. Cut off the excess and this gives you the full length of the frill making sure you cut two to this size.


3. Once you have decided how wide you want your frill to be lay the lace on and cut half an inch above for the seam allowannce. Then using a thin strip of Bond-a-Web along top of lace edge press into place. Then using a ZigZag stitch sew along the edge.


Put right sides together and stitch half an inch from the edge, then Zig Zag seam to finish off.


Zig Zag edges to finish off


You should end up with two pieces like this.


4. Put the tube of the frill over the arm of the machine right sides up then line up the seam with the seam on the puffed sleeve.


Once in place, using a Zig Zag stitch go backwards and forwards to hold in the place, then whilst holding the fabric behind the foot with your left hand, stretch the elastic with your right hand to fit the frill and carefully and slowly stitch together.


Really it isn't as difficult as it sounds and it's such a small circumferance that you have to sew, you can really handle it, just take it slowly and always be aware of how much of the frill is left to fit the elastic.


Look how these scalloped frills have transformed the sleeves.
We used a UNI QLO top for this project, but you could 'Upcycle' an old top.

Wednesday 21 July 2010

Tutorial 4 - Sew White Vintage Style Top - Part 1

Tutorial 4
White Vintage Style Top - Part 1
'Vintage Style' top with lace hem and scalloped frill on sleeves.

The technique used to shorten this top can be applied to many other projects giving a totally different look each time.

We took a regular cheap white cotton top from Uni Qlo, ( or you could 'Upcycle' an old top), but felt the length made it look a bit frumpy and that the sleeves could do with a bit of a lift.

Here's how to turn the plain top into a beautiful 'Vintage Style' top.


1. Decide how long you want your top to be.

You can go into the embroidery a little as it will be covered by the lace on the hem later.

It's very important to get the length right.

2. Lay your lace out to decide which type you are going to use.

You can also at this stage, put the piece that you cut off from the scalloped hem, onto the sleeve to see what it will be like.

3. Put the top over the ironing board the right side up and press a small hem upwards (the opposite way to how you normally would turn a hem), about 3mm all round.

4. Lay the lace onto the Bond-a-Web and cut a strip about 2mm narrower than the lace.


You never want the Bond-a-Web to be wider than the lace or trimming, because it's only to hold it in place for sewing and it's a nightmare if ever it gets onto the iron.

Then when cool, peal back the backing paper to reveal the glue.

5. When you 1st start to apply the lace make sure you overlap the side seam, then press into place.

Put a small strip of Bond-a-Web in side seam and press into place.

6. Starting from the side with no opening in the lace, stitch Imm in from hemline all the way round

Then come up the side seam still using a straight stitch and then use a Zig Zag stitch to follow the line of the scallops all the way round the top
Make sure you come down the side seam where the lace is joined to secure in place.

Now you've completed part 1 of your 'Vintage Style' white top.
For part 2 and the application of the scalloped frill onto the sleeves, go to Tutorial 5

Sunday 11 July 2010

Tutorial 3 Upstyled Orla Kiely Dress with New Lace Bib

Tutorial 3
 Upstyled Orla Kiely Dress with New Lace Bib
Using the Broderie Anglais that we bought from the Cassino Market, we've created a Bib front to give a stronger look to this Orla Kiely dress.


Obviously it can be applied to many other 'Upstyle' projects, tops or dresses so long as they have a flat front.

This is the before.

I love the dress, it's just It's a bit plain on me.
1. Un-pick the neckline from the facing, only as far round as your bib width plus 1cm on each side.

2. Fold dress in half to find the centre font line the gently press with an iron.

3. Starting 1cm in from edge start to gather lace.

For those that never gathered before just use the largest straight stitch, then when off the machine pull either the thread below or above to gather.


4. First put the Bond-a-Web down one side of your pressed centre line.


Then lay gathered lace ontop and press a little. Ease round to come up the other side, then lay another thin strip of Bond-a-Web laying gathered lace on top.


5. Once your happy with the amount of gathering and the position of the frill, you can press with an iron to hold in place.

To help pull the whole thing together I've decided to put a strip of colour under the strip of lace down the centre.

This needs to be bonded on first with a strip of Bond-a-Web cut to the right width.

6. Once everything is bonded into position, you can now hold it all in place by top stitching along the line of the scalloped edge of lace strip down the centre, as shown in above picture.

7. Lay flat over the iron board and cut away excess lace.

Make sure your fabrics are carefully layered out without any creases, as this will effect whether the lace is trimmed properly.

8. With right sides together, stitch back the original seam of the neckline.
Turn the right way round and press carefully into place.
Close-up of finished lace bib.
So here's your new Orla Kiely dress

Thursday 8 July 2010

Trip to Shoe Market in Cassino in Southern Italy

'Wonderful Shoe Market'
Just south of Rome
This is the Saturday morning Shoe Market in Cassino, South of Rome. There are 20 -30 stalls all selling shoes, it's amazing. I've been going here for years.

The shoes are of current fashions , last seasons stocks and really old stock.

They only have the sizes that are stacked in the boxes below the shoe.

The way it works here is that if it's not in fashion, nobody seems to want it, so it's really cheap or you can haggle them down on the price. The best quality stock was the previous seasons stock.


In the regular market on Via Giovanni Pascolli there's this great Haberdashery Stall selling loads of lace and braiding.

The lace comes in a huge assortment of bright colours.

The braiding on the top I bought last time I was there.

We'll be using it for the winter stuff in a Future Folk look

Broderie Anglais to die for.

We'll be showing you what we did with our purchases and on an old Orla Keily dress in Tutorial 3.

They had thousands of buttons these are just a few.
Many looked like really old stock which was exciting.


If you're in Rome it's about one and a half hours to Cassino taking the fast train to Naples. You can make a day of it and visit the Monastery at the top of Monte Cassino.


Remember it's on or in the area of Via Giovanni Pascolli every Saturday morning.

Wednesday 7 July 2010

Tutorial 2 - Upstyle, New stretchy waistband (Part 2 of Tutorial 1)

Tutorial 2
New Stretchy Waistband
This is part 2 of these fantastic trousers. Part 1 shown in Tutorial 1.


In this tutorial we'll be showing you how to remove a regular waistband with fly and put this easy, stretchy waistband on with the option of wearing it high or dropped on the hips.

1. Take an ordinary pair of loose fitting trousers. I used trousers from UNI QLO.
Or you could 'Upcyle' an old pair of trousers.

2. Look at how wide the stetchy waistband to be applied is and cut 1inch shorter than this when cutting off the waistband.

3. You need to stitch around the waist to keep the fly and pockets in place, this is called a 'Stay Stitch'.

Take care when stitching over the fly.

If you have a button fly check for buttons near to the waistseam as you may need to remove it.


4. Cut your waistband off your High Waisted Leggings.
I use American Apparell shiny Lycra high waisted leggings.


This may seem wasteful but I get alot of mileage out of one pair of these leggings, keep the rest as we'll use it in another tutorial.


Make sure you cut just next to the overlocked waist seam (so you end up with no overlocked bit). Front and back pieces are the same.


You may need to do a Zig Zag stay stitch to stop layers from moving.


Fold the in half so as to get the centre front and back and make a little notch (snip) with the sissors.

5. Put the tube of the waistband over the waist of the trousers with right sides together.


Then align the side seams and front and back seams with notches on waistband.


Because the trousers are bigger than waistband, this will only be possible to do when you stretch the waistband to fit as you sew, so just take note of where they are for now.


Using a Zig Zag stitch sew 1/2inch from edge, remember to line up seams which will seem as if trousers are too big, but when you stretch the bottom fabric ie. waistband it fits well.


Another thing to look out for is when you sew over the zip fly be careful not to break the needle, I often lift the sewing foot so as to miss it. Then try it on and if it fits ok Zig Zag stitch again for double strength. Then Zig Zag edge so it doesn't fray


New wide stretchy waistband which can be used for any type of loose fitting trousers.

Once you've tried them on if all is ok it's a good idea to do another line of stitching for double strength and Zig Zag edge to stop from fraying.


Tuesday 6 July 2010

Tutorial 1 - Upstyled Trousers with New Ribbed Cuffs Sewn onto Hem

Tutorial 1
Upstyled Trousers with New Ribbed Cuffs

This is one of my favourites.


I use this technique again and again giving a whole new look each time, depending on original trouser fabric, colour or length of ribbed cuff.


1. Take an ordinary pair of trousers. Make sure they're not too tight in the leg. I used a pair from UNI QLO. Or you could 'Upcycle' an old pair of trousers. 


2. Take a ribbed jumper and decide how long you want the trouser cuff to be.


Once you've cut this lay onto leg of trousers lining up with the hem. If the trousers were a good length, mark with chalk where the ribbed cuff goes up to.


Then allow an extra 2-3ins trouser length for seam allowance and blousing and cut trouser leg here.


3. Put tube of ribbed sleeve right sides together over trouser leg.


Align seam of sleeve with inside leg seam.
Place under foot on sewing machine so you have the trouser fabric on the top.
Sew using a straight stitch and stetch the ribbing to fit the trouser leg as you sew.
Try on, if length and fit ok, zig zag edges of seam so they don't fray  You have completed the 1st stage of your great new trousers. You can stop here or continue with the 2nd tutorial where you'll be applying the stetchy wide waistband

Search This Blog

About Me

Seamless with Shaz and Tree will show you how to make one-off, fashionable clothes easily. With Upcycling, sewing shortcuts and step by step tutorials. We'll also be doing trips out to our favourite suppliers and markets. We'll give you the tools to create you very own designer clothes

Followers